
Back to blogging again, what better to write about than AI! So you’ve been hearing a lot about running AI models locally on your own machine lately — no subscriptions, no sending your data to the cloud, just pure, private AI running straight from your device. Sounds great, right? The problem is, most people have no idea where to even start, and the first wall you hit is figuring out whether your machine can handle it in the first place.
That’s where LLMfit comes in, and honestly, it’s one of those tools I wish I had when I first started going down this rabbit hole.
What Even Is an LLM?
Before we get into the tool itself, let me give you a quick primer if you’re new to all this. LLM stands for Large Language Model — it’s the technology behind AI assistants like ChatGPT, Claude, and others. These models are essentially massive files that your computer needs to load into memory and process in real time when you chat with them.
The catch? Not every model runs on every machine. Some are so large they need a powerful GPU (graphics card) with tons of dedicated memory just to run at a usable speed. Others are smaller and more efficient, built to run on everyday laptops. The tricky part is knowing which one is right for your setup — and that’s exactly what LLMfit solves.
What Is LLMfit?
LLMfit is a free, open-source tool that scans your computer’s hardware — your RAM, CPU, GPU, and VRAM — and then matches you with hundreds of AI models that are actually compatible with your setup. It doesn’t just give you a yes or no answer either. It ranks each model across four key dimensions:
- Memory Fit — Can your device even load this model without running out of RAM?
- Speed — How fast will it actually respond on your hardware?
- Quality — How capable is this model compared to others?
- Context — How much text can the model handle in one conversation?
Think of it like a compatibility checker — except instead of checking if a game runs on your PC, it’s checking which AI brains your device can handle. Pretty neat.
It runs right in your terminal (don’t worry, I’ll walk you through that) and gives you a clean, interactive interface to browse and compare models side by side.
Before You Install — What’s a Terminal?
📌 New to this? If you’ve never opened a terminal before, don’t stress. It’s basically a text-based window where you type commands to tell your computer what to do, instead of clicking around. On Windows, it’s called PowerShell or Command Prompt. On Mac, it’s called Terminal. We’ll only need it briefly for the install — after that, LLMfit has a visual interface that’s easy to navigate.
Installation
🪟 Windows
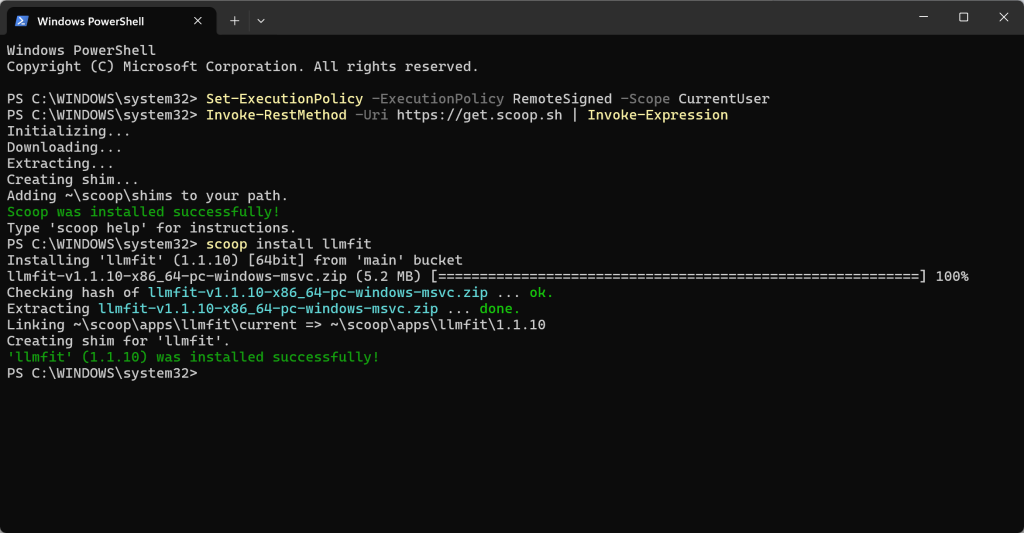
On Windows, we’ll use Scoop — a lightweight package manager that makes installing command-line tools a one-liner. Think of it like a silent app store that works from your terminal.
Step 1 — Install Scoop
Open PowerShell by pressing the Windows Key, typing PowerShell and run the following commands when it works (NB: If it doesn’t work, run as Administrator)
Set-ExecutionPolicy -ExecutionPolicy RemoteSigned -Scope CurrentUser
Invoke-RestMethod -Uri https://get.scoop.sh | Invoke-Expression
Once that’s done, Scoop is installed and ready to go.
Step 2 — Install LLMfit
Still in PowerShell, type this and hit Enter:
scoop install llmfitThat’s it. Scoop handles the download and install automatically. No manual setup, no digging through files, no headaches.
🍎 macOS
On Mac, we’ll use Homebrew — the most popular package manager for macOS. If you’re a Mac user who does any kind of technical tinkering, you’ve probably come across it before.
Step 1 — Install Homebrew
Open Terminal — press Command + Space and type Terminal to find it. Then paste the following and hit Enter:
/bin/bash -c "$(curl -fsSL https://raw.githubusercontent.com/Homebrew/install/HEAD/install.sh)"It’ll walk you through the setup step by step. Just follow the prompts.
Step 2 — Install LLMfit
Once Homebrew is set up, run this:
brew install llmfitAlternatively, if you’d rather skip Homebrew entirely and just want a quick install, this one-liner does the job too:
curl -fsSL https://llmfit.axjns.dev/install.sh | shEither method works perfectly fine. The Homebrew route is easier to manage long-term since updates are handled automatically whenever you run brew upgrade.
Running LLMfit — Let’s See What Your Machine Can Do
Once LLMfit is installed, open your terminal and type:
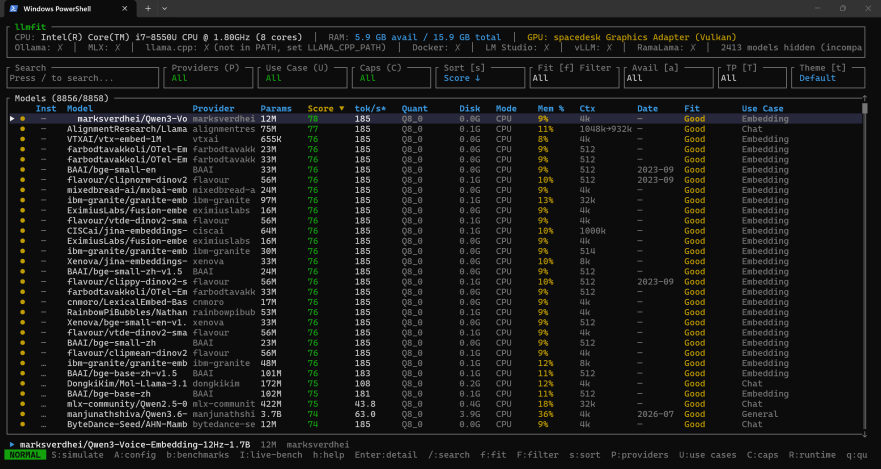
llmfitHit Enter and you’ll be greeted by an interactive table — the TUI (Terminal User Interface). At the top you’ll see your detected hardware specs — RAM, CPU, GPU, and VRAM — automatically pulled from your system. Below that, every model in the catalog is listed and ranked specifically for your machine.
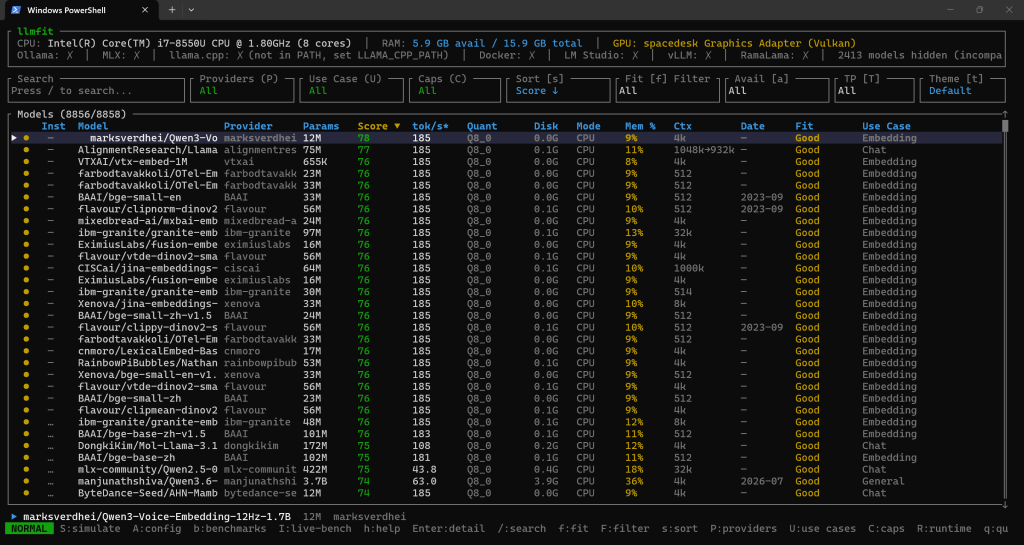
You’ll see columns for fit, speed, quality, and context. Green indicators mean a model runs well on your setup, yellow means it’s pushing it, and red means don’t bother — your device simply isn’t equipped for that one. You can scroll through the list, filter by model size, and get a detailed breakdown for any individual model you’re curious about. (the screenshot above was from one of my older machines which I used today to write this post as i’m currently travelling).
If you just want a quick plain-text table without the interactive view, run:
llmfit fitOr if you want LLMfit to make the decision for you and return just the top picks:
llmfit recommend --jsonNo guesswork, no trial and error — just a clear list of what actually works for your setup.
What Happens After You Pick a Model?
Once you’ve identified which model fits your hardware, the next step is actually downloading and running it. LLMfit supports several local runtime providers — these are the applications that load and run the AI model on your device. The main ones include Ollama, LM Studio, llama.cpp, and MLX for Apple Silicon Macs. LLMfit will even point you in the right direction based on the model you’ve selected.
And this is where I’ll leave you hanging for now. 😄
In the next post, we’ll take one of the models LLMfit recommended and actually install and run it locally using Bionic LLM. We’ll go through the whole process step by step — from downloading the model to having a full conversation with it running completely offline on your own machine. Stay tuned, it’s a good one.
Quick Recap
- LLMfit scans your hardware and tells you exactly which AI models will run well on your device — no guessing involved.
- On Windows, install it via Scoop in PowerShell.
- On macOS, install it via Homebrew or the one-line curl command.
- Run
llmfitin your terminal to launch the interactive interface and browse your options. - Next post: we’ll use Bionic LLM to download and run your chosen model locally. Stay tuned!
Have questions or running into issues with the install? Drop a comment below and I’ll do my best to help.